How To Make Garlicky Dill Pickles
For some reason people think making pickles is difficult. But, making pickles isn’t hard, especially once you get the hang of it. My twin sister thinks I’m some sort genius at this kind of culinary art and should write a book about said practice. Once you understand the nuances in flavor that help create the brine, it really isn’t rocket science. Hell, if I can do it, pretty much anyone with half a brain can. There is some trial and error, so if you’re just starting out be prepared to throw some food away. Even I still stumble. I recently cracked a jar of pickled rhubarb from last year, since rhubarb is now in season, and was planning on replacing last year’s canned bounty with this year’s offering. The first bite was immediately spit into the kitchen sink. Who the F made this garbage!?! Oh right, yours truly. Not that the flavor was off or had spoiled (thankfully) but the acid in the brine had turned the rhubarb to complete mush over time. Lesson learned. So you’re going to win some and you’re going to loose some but over time you’ll be knocking it out of the park like you’re a freaking starter for the best baseball team in the league (aka The RED SOX, duh!).
But before we get into the actual recipe and it’s steps, let’s give a quick synopsis of what it means to be a “pickle.” Most Americans seem to think a pickle is just a fancy, spiced-up cucumber, looking down it’s nose at it’s boring cousin. Sure that’s true, but what is being pickled doesn’t have to be a cucumber. As I stated earlier, I’ve pickled rhubarb. I also have a jar of pickled cherries I’m waiting to open and recently posted a pickled garlic scape recipe. I haven’t done it yet, but you can even pickle eggs. The closest I’ve ever come to that is a pickled egg juice-back after a whiskey shot, and don’t even get me started on what a sh*t show of a night out in NYC that was! So, as Portlandia famously stated and is oft quoted around our house, “You can pickle that!”
That said, there are different forms of pickling and certain kinds work better for whatever is being preserved. The easiest method, which I’ll be showcasing, is “quick pickles” aka “refrigerator pickles.” Moving on from there, “freezer pickles” are usually fruit based since the sugar content helps seal in flavor. Indian cuisine also has many pickles but we Americans living in a very sheltered food world, call all them “chutneys.” Asian food also has many types of pickles. I mean, Korea practically runs on Kim Chi.
Which leads me to the most complex way to pickle something, “fermentation.” I won’t get into the complicated process here and will save it for another time but yes, you probably have at some point eaten a fermented cucumber labeled as a “pickle.” Ever had a “full sour” or “half sour” pickle? Yeah those tasty little things sat out at room temperature long enough for cultures to form and give tartness to the cucumber. Hot Doug’s (RIP) in Chicago had a killer version of the full sour and in my experiments, that meant the batch sat out for about two weeks. I dare you to leave something on the counter for that long, consume it and be whisked off to tastebud Nirvana. (No, PLEASE don’t do that!) More likely than not you’ll be spewing your guts out. But hey “A” for effort! I digress. Let’s get this pickle party pumping…
GARLICKY DILL PICKLES
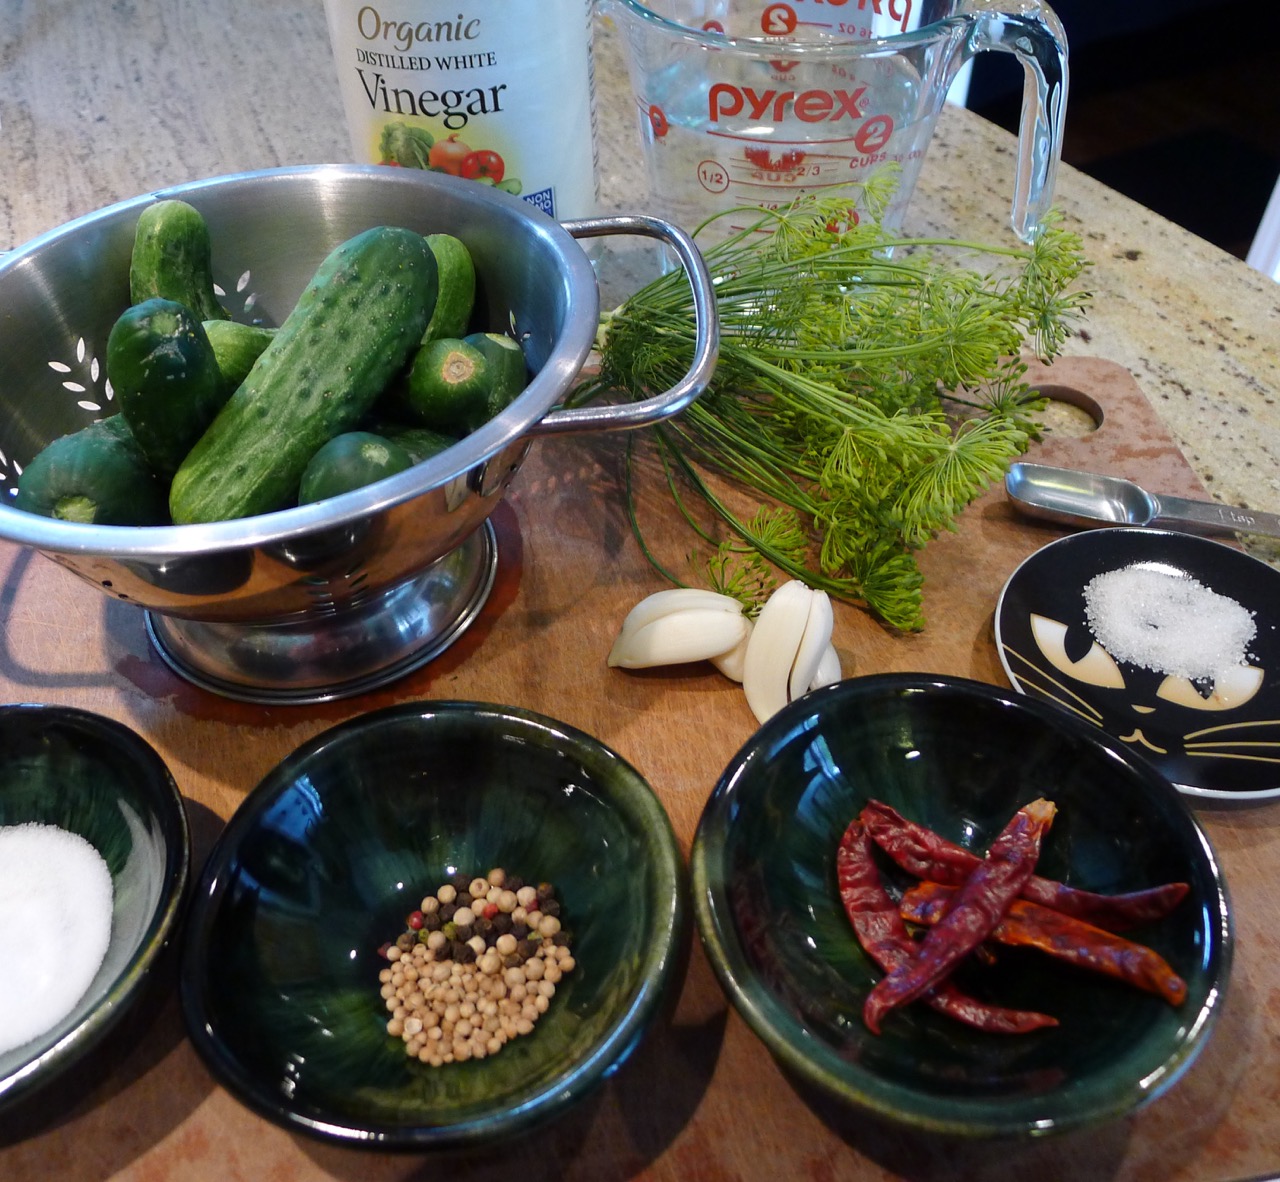
1# Pickling Cucumbers
5 Sprigs Fresh Dill
3 Garlic Cloves
4 Chiles De Arbol
1/2 t Whole Peppercorns
1/2 t Whole Coriander Seeds
1 1/2 t Salt
1 t Sugar
1 C Water
1 1/2 C Distilled Vinegar
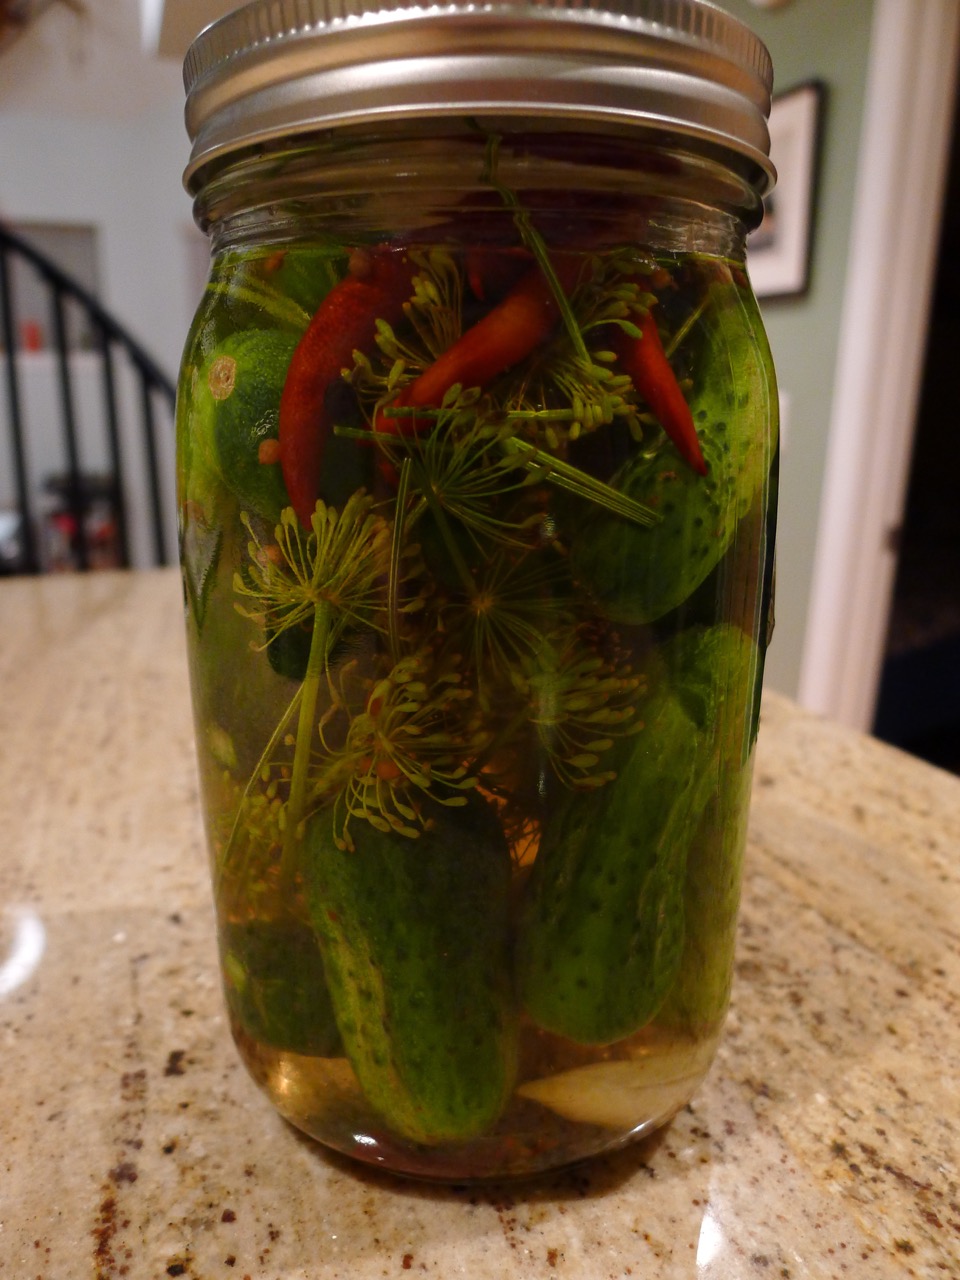
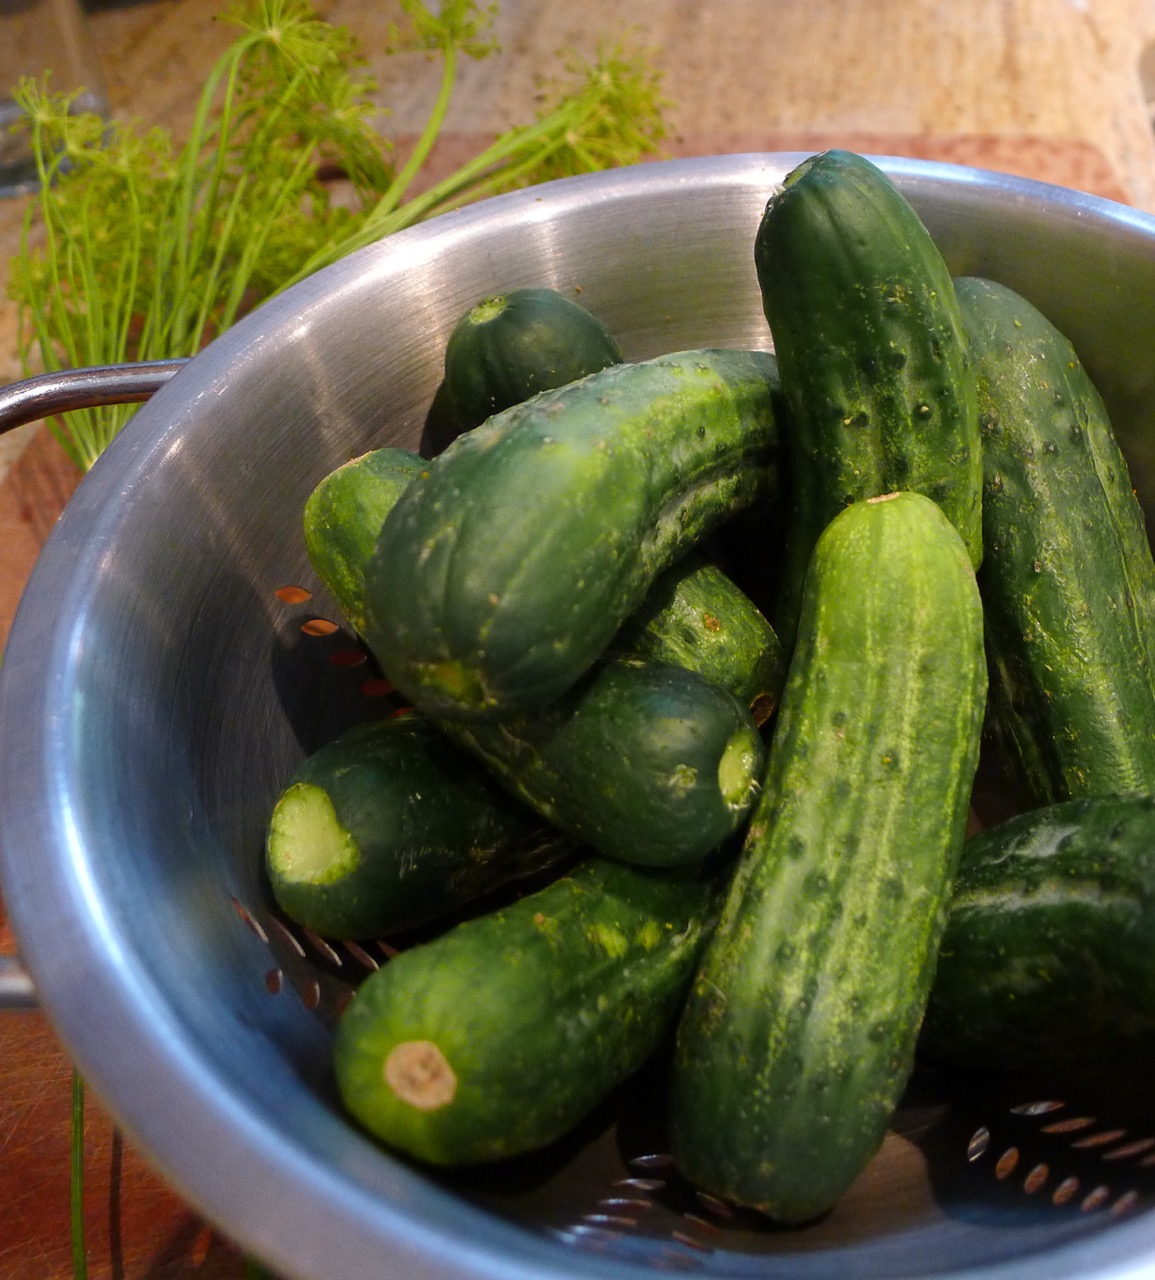
Pickling cucumbers come in all shapes and sizes. Some farmers will actually sell their ugly looking regular cucumbers as pickling ones. They work but have a higher water content and less sturdy flesh so they’re not ideal for this process. What you’re looking for are the stubby, bumpy, is-that-safe-to-put-in-my-mouth kind of cucumber. You may have to trim your cucumber down into spears (or into rounds if you prefer) but I selected little whole ones. I love shoving whole pickles in my mouth, take that as you will. So give your cukes a rinse before cutting it if doing so, as well as the dill. Let them dry and place them in a quart jar, alternating between pickles and dill. Why do you think we do that? To help spread the flavor of dill around.
Next up you’re going to take your garlic cloves and gently crush them. You can smash them if you had a bad day at the office but I’d recommend taking the flat edge of a chefs knife, blade away from you (come on, safety first!) on top of a clove and apply pressure until you feel the clove crack. Feel free to increase the amount of garlic if you really dig on that sort of thing, and the same goes for the chile de arbol if you like pickles with a little more heat. Take all of the ingredients and put them in a pot, give it a quick stir, and crank it up to high on the stove. Heat the mixture until the salt and sugar has dissolved. If you’re unsure if they have, just bring it to a boil.
Now this is important <read- don’t screw it up>
Remove the mixture from heat and allow it to COOL to room temperature. Despite all of their tough looking exterior, cucumbers are delicate. If you pour hot liquid over them, they just go soft. Also, before pouring the brine over the stuff in the jar, give it one last stir to mix up all the aromatics. Pour the brine to cover the cucumbers and turn the jar over a couple of times to mix up everything. Don’t shake it. Remember what I said about delicate! Place it in the fridge and let it sit for at least 48 hours. If you have ants in your pants, 24 hours will work, but you are missing out on some serious flavor country. The longer they sit the better they get and could even last over a year. But if those delicious little cukes are still there that long, you should probably just stick to eating fast food.
Last but not least, there are a million and one pickling books out there (another reason I won’t be writing one anytime soon, sorry sis) but I really love “The Joy of Pickling” by Linda Ziedrich. It has very user friendly recipes which taste great. The book features easy pickling recipes as well as more complex ways of preserving food. But wait there’s more! (I swear I’m not getting paid for this.) The Joy of Pickling has a global perspective and features recipes from around the world, as well as short pieces on each area’s use of pickles and their ingredients.
As always feel free to contact me for questions or recipes, I do have larger industrial-sized pickling recipes if you want to go crazy!
Cheers,
Chef Sean
Vietnamese Sweet Lemon Curry Soba Noodle Tofu Salad
- At September 10, 2016
- By megan
- In carrot, curry, Farm to Table, favorites, garlic, local foods, noodles, Recipes, Savory Spice Shop, tofu, tomatoes
 0
0
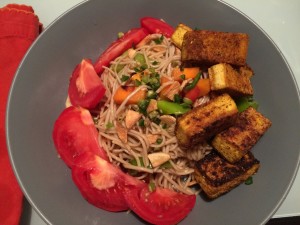
If I’m going to enjoy tofu, it HAS to have been frozen, thawed, and pressed before being seasoned and cooked. Freezing tofu changes the texture into something I almost find enjoyable, so there’s always a block sitting in our freezer. This cold soba noodle salad with tofu, locally grown carrots, peppers, and tomatoes, and fried garlic is well worth repeating.
Here’s how I made it.
First, the thawed tofu needs to be pressed to expel excess liquid. I usually wrap it in a few layers of paper towels and gently squeeze it, being careful not to squeeze too hard and tear the block. Then it’s ready to be cut into bite-sized pieces and marinated. I chose a dry rub since it was going to be fried. Wet marinades make for quite a mess when it hits hot oil. Lesson learned!
The tofu was generously seasoned with Vietnamese Sweet Lemon Curry from Savory Spice Shop and then pan fried in peanut oil until crispy on all sides. The secret to getting a nice crust on each side is having a hot pan, hot oil, and not checking the food to see if it’s cooked, but waiting until it’s fully seared before flipping it. The chef-husband had to lecture me a few times on this before I listened, and what a difference it makes! Gone (hopefully) are the days of tofu sticking to the pan and breaking apart when it’s flipped, leaving smaller pieces to burn and stripping the tofu of it’s coating (read: flavor). After each side gets a crust, just remove them and let them cool.
Next, a chopped carrot and green pepper from the Boulder Farmer’s Market went into the peanut oil pan to heat them ever so slightly. I boiled soba noodles according to the instructions on the package and then rinsed them in cold water to keep them from cooking, fried some garlic until crispy, chopped a jalapeño, and sliced a tomato.
I tossed the cold noodles with sesame seeds and the carrot and pepper pieces, and then drizzled some toasted sesame seed oil, fresh squeezed lemon, soy sauce (I prefer the unpasteurized Nama Shoyu brand), and a little local honey. Finally, I added diced jalapeño and crispy fried garlic for an extra crunch and kick.
Spice Club
- At November 17, 2015
- By megan
- In Savory Spice Shop
- 0
The first rule of Spice Club? Talk about Spice Club!
That’s the first thing I read when opening one of my envelopes containing three months of seasonings and recipes as a sample of the new Savory Spice Shop Spice Club.
What is Spice Club? It’s a monthly spice subscription service that delivers you a different handcrafted seasoning and an herb or spice with a recipe featuring the selected seasonings and spices. Found yourself in a recipe funk and don’t know what to make? Try out something new that was just delivered to your door. I like this idea!

Above is a photo of one month’s Spice Club delivery. It’s a bag of Southern Spain Pinchito Spice, which I’ve never tried but have always been curious about trying, and a bag of Crushed Aleppo Pepper, which I always keep in my pantry and welcome the refill. The recipe card is for Grilled Pinchitos with Yogurt Lime Dipping Sauce. One side of the card explains the spices, and the other has a recipe that can be made with beef, pork, lamb, chicken, or as a vegetarian fare.
We’re really looking forward to exploring these new spices, so stay tuned to see what we make here at home.
In the meantime, check it our for yourself on Savory Spice Shop’s Website. I think my holiday shopping just got a little easier this year!
Maple Masala Pecan and Szechwan Peppercorn Crusted Tofu
- At June 19, 2015
- By megan
- In favorites, Olomomo Nuts, pecans, Recipes, Savory Spice Shop, Sean Smith, tofu
- 0
The first thing Sean said upon tasting the Cosmic Maple Masala Pecans by Olomomo Nut Company was that they’d make a great crust to something. Indeed they did with the addition of Szechwan Peppercorns from Savory Spice Shop.

He ground them in our mortar and pestle, and then crusted some extra firm tofu that had been (of course) frozen, thawed, and pressed. The tofu pieces were crusted and pan fried in peanut oil until oh-so-gorgeously golden brown.

These were a perfect accompaniment to sautéed greens and brown rice. Nothing fancy, but a somewhat effortless great meal thanks to the maple masala crust.
Let’s get Social