Fall Succotash, a Unique Thanksgiving Side Dish
- At November 10, 2019
- By megan
- In Corn, Party Planning, Recipes, thanksgiving
 0
0
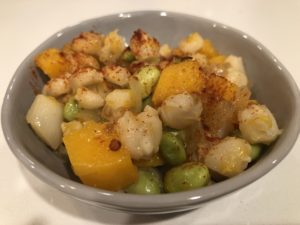
There are so many delicious side dishes at Thanksgiving. They really make the meal, in my opinion. As I write this I’m craving cranberry sauce, stuffing, and my caramelized onion gravy smothered all over everything. But, it’s fun to try new dishes and steer away from “traditional” flavors. One new side we’ll be serving this year is a fall succotash.
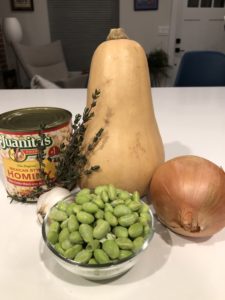
Succotash is traditionally served with fresh corn and lima beans. Our twist on this classic dish features hominy and edamame.
Hominy, according to Wikipedia, is produced from dried maize (corn) kernels that have been treated with an alkali, in a process called nixtamalization (nextamalli is the Nahuatl word for “hominy”). It’s essentially big pillowy chewy “corn” with more bite than traditional kernels. You can find it in one of the canned food aisles in most grocery stores.
This dish is very easy to prepare.
Ingredients:
- 1 Butternut Squash, peeled and medium diced
- 1 Yellow Onion, small dice
- 2 cloves garlic, minced
- 1 can of Hominy, rinsed and drained
- 1 bag frozen shelled Edamame
- a sprig of Thyme
- 1.5 Cup White Wine
- Lemon
- Olive Oil
- Salt
- Pepper
- Paprika
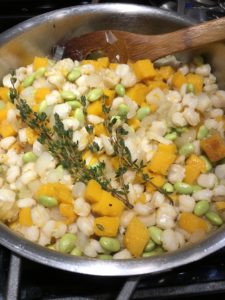
Heat a couple tablespoons of olive oil in a large pan and add the squash, stirring frequently so it doesn’t brown (or burn!).
Add in the onions, garlic, edamame, and thyme and reduce heat to low. Stir occasionally and cook until the squash is tender. Add wine to deglaze the pan and to prevent that squash from burning or browning. We want a vibrant orange in this dish.
Add in the hominy, season with salt, pepper, a little lemon juice, and remove from heat.
Top the dish with a little paprika for pizzazz!
White Derby Cake
- At June 16, 2018
- By megan
- In banana, cake, Party Planning, Recipes, strawberries
 0
0
I was recently tasked with baking a birthday cake, and the plan was for a vanilla cake for a two-year-old’s taste buds. After going back and forth on the icing options, I recalled that as a child in New Jersey my mom would take my sister and me to La Bonbonniere Bake Shoppe and we’d get our cakes there for special occasions. My favorite had a whipped cream frosting with fresh fruit incorporated into it, but that’s where my memory faded. Good ole mom to the rescue! A quick text message later and I learned I always wanted a Brown Derby Cake- a chocolate cake with whipped cream and fruit covered in cocoa powder. A quick Google search, and thinking “white” as a substitute word since it was a vanilla cake I was looking to make, and sure enough, there’s a White Derby Cake.
This is a perfect dessert in my opinion. A classic vanilla cake with freshly whipped cream sweetened with a little maple syrup and topped with fresh fruit. It’s WAAAAY better (in the healthy sense) than buttercream frosting which is all butter and loads of sugar. Sure, whipped cream isn’t the best thing for your arteries, but it’s not full of excess sugar as it doesn’t need to be to satiate the taste buds. Whipped cream doesn’t linger on the tongue like buttercream frosting, so you can get away with using so much less sugar.
Ingredients for the vanilla cake-
- 2 sticks (1 cup) unsalted butter, softened
- 1.5 cups organic cane sugar
- 1 TBS aluminum free baking powder
- 1/2 tsp kosher salt
- 4 large eggs
- 1 cup whole milk
- 2 tsp vanilla extract
- 2 2/3 cups all-purpose flour
First, preheat the oven to 350 degrees F and lightly butter entiredly and then line with parchment paper the bottoms of two 8×2 inch round cake pans.
Next, in your KitchenAid stand mixer, cream together the butter, sugar, baking powder and salt. Add the eggs and beat until fluffy. Reduce the speed to low and beat in the milk and vanilla. It’s going to start looking curdled like cottage cheese, and that’s what you’re going for. Then, slowly add the flour until the batter is smooth.
Pour evenly into the prepared pans and bake for 30-35 minutes until a toothpick inserted in the middle comes out clean.
Cool the cakes on wire racks for ten minutes before running a small knife around the edges and flipping them out of the pans onto the wire racks to completely cool.
I made the cake the day before the party and let both cake layers cool completely before wrapping them in parchment paper and then plastic wrap to keep them moist over night.
A few hours before the party I prepared the filling- strawberry whipped cream with bananas.
I stopped by the local farmers market for strawberries, which I cut up into somewhat smaller pieces, mixed them with a tablespoon of sugar, and let them macerate for an hour or so. I had purchased two pints of heavy whipping cream, and used 2/3 of one to make the portion for the filling, which was then mixed with the macerated strawberries so it would turn pink and be sweetened by the berries.
Then I topped this layer with thinly sliced bananas.
I added another cup or so of the strawberry whipped cream on top of the banana slices and then the other layer went on top and I pressed it down to try and even out the filling.
I refrigerated the cake until just before serving to keep the freshly made whipped cream firm.
I whipped the rest of the heavy cream with about a tablespoon of maple syrup, and then spread it all over the cake. There’s a bit of a mound in the center because that’s the way I remember it being as a child. Thinly sliced bananas and strawberries adorned the cake to make sure you get a serving of fruit with your cake.
Enjoy!
Chipotle Roasted Fall Vegetables
So summer is over, but that doesn’t mean that there still isn’t amazing local produce to cook up. A few things I love doing this time of year, especially when the temperature drops down, is roasting what I can still get from the farmers market. One of my favorites is combining root vegetables with the slightly spicy chipotle pepper. There is something about the earthiness of root vegetables and the smoked flavor that chipotles bring that are a match made in heaven. Turnips and rutabagas work best for this but a few other choice fall veggies help to round out the side dish. This dish compliments most proteins, especially turkey which of course is going to be on everyone’s plate in a few weeks!
ROASTED FALL VEGTABLES WITH CHIPOTLE
1 Medium Turnip
1 Medium Rutabaga
1 Large Parsnip
2 Large Carrots
1 Large Yellow Onion
1 Can of Chipotle in Adobo Sauce
Set oven to 375. Peel and dice the root vegetables. I like to leave them a little chunky but as long as they’re uniformly cut they should roast up just fine. Next, toss the vegetables in a high heat cooking oil. You want enough oil to coat them but not to much where they get soggy. Then, and this is where the recipe can be changed depending on your affinity for spicy foods, toss the vegetables with at least 2 chipotle peppers and about a tablespoon of the adobo sauce. Don’t worry if you think you’ve added to much, once the natural starches in the veggies convert to sugars while roasting in the oven it will taste delicious. And if you like things with some heat, add in a couple more peppers and sauce. Give a quick toss with some salt and spread out on a baking sheet. Bake until fork tender, about 30 minutes, mixing occasionally.
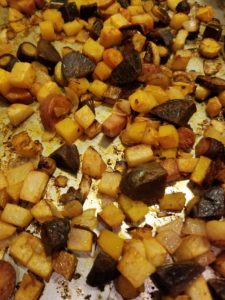
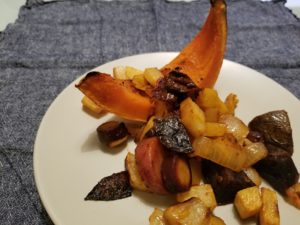
I also roasted a Kabocha Squash seasoned with Black Dust Coffee & Spice Rub from Savory Spice Shop.

These two together make for a unique Thanksgiving side dish.
Personal Chef Services
- At February 23, 2017
- By megan
- In Party Planning, Personal Chef, Sean Smith
 0
0
Hello Friends!
A Bolder Table started as a food blog in 2009. My goal was to compile my recipes in one place, and it’s evolved into a space where I express my thoughts on food, share recipes, talk about restaurants, and help promote my favorite local foodies.
When I started blogging, I had no idea I’d meet and marry a chef. After more than twenty years working in professional kitchens, Sean is making the leap to being a full time personal chef. We’re really excited to spend more time together, to stop eating dinner at 11:30pm after he returns home from work, and to help make other peoples’ lives easier and more delicious.
We’re now transitioning to a personal chef service, so our blog posts will soon migrate to the “blog” section. We’ll continue to fill them with easy to follow recipes and keep you updated on anything food-related we’re excited about here in Boulder and across the Front Range of Colorado. We’ll also keep you up to date on the delicious meals he’s making for some hungry locals.
We are happy to unveil our new personal chef services. Stay tuned for the updated website!
Cheers!
Megan & Sean



Let’s get Social