Pumpkin Scones
- At November 15, 2009
- By megan
- In cream, ginger, Maple, pumpkin, scones, taste and create
 0
0

This was my first month participating in Taste and Create, which pairs up fellow food bloggers to prepare someone else’s dish and blog about it. I was paired up with Love Big, Bake Often, and chose to re-create some pumpkin scones since it is indeed pumpkin season.

Here’s my adaptation of the recipe:
- 2 cups whole wheat pastry flour
- 1 tsp cinnamon
- 1/4 tsp nutmeg
- 1/4 cup evaporated cane juice
- 1 tsp baking powder (1.5 for everyone not living and baking at altitude)
- 1/8 tsp baking soda (1/4 for lower elevation)
- a pinch of sea salt
- 1/2 TB grated fresh ginger
- 2 TB chopped candied ginger
- 5 TB butter, cold, cubed
- 1/2 cup buttermilk
- 1 TB maple syrup
- 1 tsp vanilla
- 1/2 cup pumpkin (from a real pie pumpkin that has been cut in half, seeded, boiled, and skinned. Trust me, it is worth the extra effort.)
- 1 TB heavy whipping cream
- raw sugar
Preheat oven to 400 and lightly butter a scone tray (if you have one- otherwise, a baking sheet will do just fine).
In a large bowl, combine the flour, cinnamon, nutmeg, sugar, baking powder, baking soda, salt, fresh ginger, and candied ginger. Mix this evenly with a wire whisk or fork. In another bowl, mix the buttermilk, maple syrup, vanilla, and cooked pumpkin.
Cut the cold butter cubes into the flour mixture with two knives or your hands. The idea is you don’t want to melt the butter by squeezing it between your fingers. You want the butter to stay relatively cold, so using two knives keeps the heat of your hands away. Regardless, mix this well until the texture becomes crumbly and there are no large chunks of butter. Then add the wet ingredients, mix together, and knead a few minutes to work the dough.
If you have a scone pan, divide the dough into the individual sections. If not, place on a lightly floured cutting board, slice it into even pieces, and place on your cookie sheet. Brush the tops with cream and sprinkle with raw sugar. Bake until a toothpick inserted in a scone comes out clean.
If you’d like to make them sweeter, I made a sweet, light glaze to drizzle over them from 1/4 cup un-sweetend rice milk (use real milk if you have it), 1/2 cup powdered sugar, and 1 TB maple syrup. These scones didn’t really need a glaze, but the original recipe had one, so I made a dessert-like topping that came in handy when we ate them for a late night snack.
Tempeh and Spinach Enchiladas

Saute 1/2 red onion, finely chopped, and 4 cloves chopped garlic in a pan with a little peanut oil until it is nice and fragrant and the onions are soft. Next, add 1/4 cup chile mix for enchilada sauce and 3 TB chile powder. Mix this all really well before adding 1.5 cups water.

Into this sauce base, add a 14.5 oz can of diced tomatoes. I added a can of tomatoes with green chiles for extra flavor. Bring this to a boil and lower heat to simmer while prepping the rest of the meal. Stir occasionally.

For the tempeh filling- 1 package of tempeh sliced into finger-length pieces. Mix up 2 TB peanut oil, juice from 1/2 lemon, some onion and garlic powder, and fresh ground black pepper. Toss the tempeh strips in this and then grill for 5-7 minutes. When cool enough to touch, slice them into fine strips as seen in the photo above.
Next, peel and slice 4 carrots, grill, and then further slice into fine pieces. Mix these in a bowl with the tempeh and 1.5 cups chopped frozen spinach.

Cover the bottom of a large Pyrex baking dish with the sauce. Next, place one layer of whole wheat tortillas (tear them apart if they’re too big). Pour in the tempeh mix, a little more sauce, cheese, another layer of tortillas, and the rest of the sauce. Cover with foil and bake at 375 for 20 minutes or so. Remove from oven to check and see if it is done. If so, add another layer of cheese and bake just until it is all melted. I served this with homemade Sweet Potato Chips and guacamole. Enjoy.

Rice and Potato Bake

This was a last-minute meal on a busy work day. It was good, but needed a sauce, so I topped it with Frontera brand Roasted Tomato Salsa and served it with avocado (because I had lots of ripe avocados on the counter) and Tillamook White Cheddar Cheese.
Ingredients:
- 2 cups veggie broth
- 1 cup long grain brown rice
- 1 medium sized yellow onion, chopped
- 1/2 lb potatoes, rinsed and cut into 1/2 inch cubes
- 1/2 cup veggie broth
- 1 can cannellini beans, rinsed and drained (please feel free to use black or kidney beans)
- 2 cups chopped spinach
- 6 eggs, beaten
- 1 cup veggie broth
- 1/2 cup olive oil
- 1 TB Worcestershire sauce
- 1/2 TB onion powder
- 1/2 TB dried cilantro
- red pepper flakes, to taste
First, bring 2 cups of veggie broth to a boil. Add the rice, stir, lower the temp to simmer, cover, and cook (45-50 minutes, most likely- read your rice instructions if you bought a package). Half-way through your rice cooking, preheat the oven to 375.
Heat a separate saute pan on medium-high and add the chopped onion. When it starts to sizzle, add 1/2 cup veggie broth, bring it to a boil, and soften the onions. Next, add the potatoes and cook until they are just done. Add the beans and spinach and turn off the heat.
In a large bowl, add the eggs, 1 cup veggie broth, olive oil, Worcestershire, onion powder, cilantro, and red pepper flakes. Whisk this well, and add the cooked rice and the onion, potato, bean, and spinach saute. Mix this well and pour into a large Pyrex baking dish. Notice that I do not add extra salt. Veggie broth is loaded with sodium, and the salsa topping has a lot of sodium also, so this dish does not need any more added salt. Bake for 45-50 minutes, or until a knife inserted in the center comes out clean. Enjoy.
Local Free-Range Eggs vs. Whole Foods Cage Free Eggs
- At November 9, 2009
- By megan
- In Eggs, favorites
- 2

This is a photo of a local, free range hen. I had the pleasure of eating some of her and her friends’ eggs, so I decided to compare and contrast them with cage free eggs from Whole Foods.

These 4 eggs are from local and free-range hens. The two white-ish eggs actually have a green shell and come from Aracauna hens. All of the local hens spend lots of time walking around outside and get to eat lots of kitchen scraps and surplus from the owner’s garden.
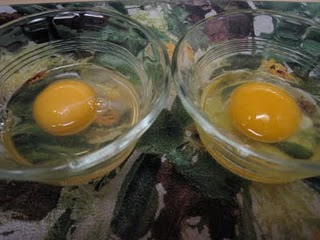
The egg on the left is a cage free large brown egg from Whole Foods. These are the eggs I usually buy. The one on the right is from one of the local hens. There is a big difference in the color and size of the yolk and the albumen (egg white), especially up close. The photo doesn’t do the best job demonstrating this, but the difference is quite clear.

This is 4 store-bought cage free eggs beaten.
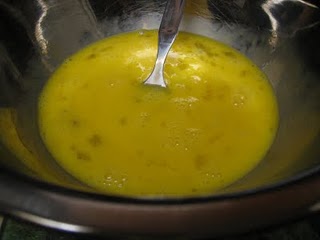
This is 4 local eggs beaten. Big color difference here. Also, the store-bought eggs were thinner and kind of frothy, while the local fresh eggs had a thicker consistency. Maybe this is because there was more yolk in the local fresh eggs.
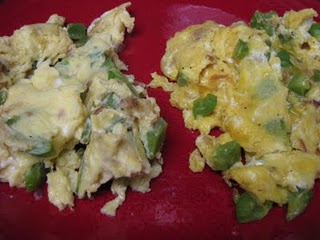
I made a simple scramble. I sauteed some red onion in olive oil. Added some green pepper, and then the eggs to make two identical scrambles. Both were lightly salted and peppered. I didn’t make anything fancy so I could truly judge the taste of the eggs. The scramble on the left is from the Whole Foods eggs. It is much paler than the local eggs scramble on the right. Also, the flavor of the local eggs was really amazing. They were simply the best eggs I can ever remember eating. The store-bought eggs were bland, and not pleasant to eat next to something so far superior. They revealed themselves as better suited to be masked with other flavors, such as cheese, sauces, etc., than to be enjoyed for what they are, like the local eggs, which were exceptionally delicious.
Let’s get Social