Rhubarb Pie
- At May 23, 2017
- By megan
- In dessert, Martha Stewart, pie, pie crust, rhubarb
 0
0
Chef Sean Smith is a fan of Martha Stewart’s recipes because they are easily multiplied. That essentially means she nails the ingredient ratios so if you’re making a double or triple batch of cookies, you can be confident that doubling or tripling her recipe will end up with something delicious. So, when I was tasked with making a pie for our clients, I went right to Martha.
The recipe starts by suggesting you make this pie the day before you plan to serve it, which is exactly what I did. I suggest you make your pie crust first and keep it cold in the refrigerator. Make your crumble topping second and keep it cold in the fridge as well until you’re ready to sprinkle it on top of the filling. Below you’ll find three sections: dough, filling, and crumble topping.
Ingredients for the Pie Dough:
- 2.5 cups all-purpose flour
- 1 teaspoon sugar
- 1/2 teaspoon fine salt
- 2 cups cold butter, cut into small cubes
- 1/4 (or a little more if needed) ice water
The easiest way to make dough is to add the flour, sugar, salt, and butter to a food processor and give it a whirl. Then slowly add the ice water until it’s dough. Finish by forming it into a ball, wrap it in parchment paper, and refrigerate until you’re ready to use it.
Ingredients for the Pie Filling:
- All- purpose flour, for dusting
- 1 3/4 pounds (approximately 6 cups) rhubarb with the ends trimmed and cut crosswise into 3/4 inch pieces
- 1 cup sugar
- 2 tablespoons cornstarch
- Pinch of salt
Ingredients for Crumble:
- 3/4 cup flour
- 1/3 cup packed light brown sugar
- 3 tablespoons sugar
- pinch of salt
- 6 tablespoons chilled butter
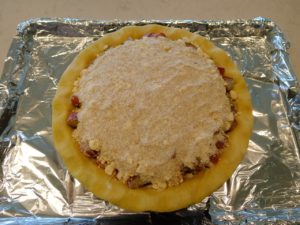
And now to make the pie! Here’s my pie before baking, just for reference.
- Place the pie dough on parchment paper and roll it out to fit in a 9 in pie pan. Fit the dough into the pan, trim/crimp your edges, and refrigerate for an hour.
- Preheat oven to 400 with the rack at the lowest level.
- Add the crumble ingredients to a bowl and mix until the butter is somewhat evenly distributed. Chill in the fridge until you reach step 5.
- In a large bowl, toss the rhubarb with sugar, cornstarch, and salt.
- Pour filling into the pie crust, distribute it evenly, and sprinkle the crumble topping on top.
- Place pie pan on a foil-lined rimmed baking sheet. This is important as it will help clean up be a synch!
- Place your pie in the oven and lower it to 375 degrees. Bake for approximately 1.5 hours and cool completely before serving.
Mother’s Day Private Chef Dinner
- At May 15, 2017
- By megan
- In Personal Chef, pie, Potato, Private Dining, rainbow chard, Sean Smith
 0
0
Chef Sean and I had the honor of cooking a three course dinner for clients to celebrate Mother’s Day this year in downtown Boulder. He was in charge of everything except the Rhubarb Pie, which I successfully put together the day before.
I set the table for four while he was busy cooking. The first course was delectable- Crab cakes with a watercress, mizuna, and apple salad and a champagne mustard vinaigrette.
The second course was planned for the Texans visiting family in Boulder: Steak and potatoes.
Chef Sean made twice baked potatoes filled with pancetta, roasted garlic, parmesan, ricotta, and green onion served on top of sautéed spinach and chard from the Boulder Farmer’s Market. The steaks were topped with a relish of roasted peppers and pickled chilies (he pickled the chilies last summer during pepper season at the market).
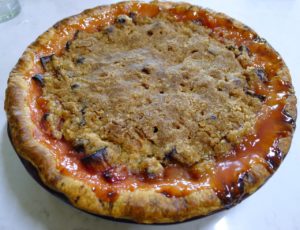
We ended with my Rhubarb Pie.
It’s always fun cooking for hungry clients. Please let us know what we can cook for you!
Cheers~
Personal Chef Services
- At February 23, 2017
- By megan
- In Party Planning, Personal Chef, Sean Smith
 0
0
Hello Friends!
A Bolder Table started as a food blog in 2009. My goal was to compile my recipes in one place, and it’s evolved into a space where I express my thoughts on food, share recipes, talk about restaurants, and help promote my favorite local foodies.
When I started blogging, I had no idea I’d meet and marry a chef. After more than twenty years working in professional kitchens, Sean is making the leap to being a full time personal chef. We’re really excited to spend more time together, to stop eating dinner at 11:30pm after he returns home from work, and to help make other peoples’ lives easier and more delicious.
We’re now transitioning to a personal chef service, so our blog posts will soon migrate to the “blog” section. We’ll continue to fill them with easy to follow recipes and keep you updated on anything food-related we’re excited about here in Boulder and across the Front Range of Colorado. We’ll also keep you up to date on the delicious meals he’s making for some hungry locals.
We are happy to unveil our new personal chef services. Stay tuned for the updated website!
Cheers!
Megan & Sean
Fire Cider
- At December 29, 2016
- By megan
- In Recipes
 0
0
We received a small bottle of something called Fire Cider for Christmas. I’d never heard of this before, so I immediately opened it up for a taste.
WOW! It’s incredible. It’s a savory, tangy, spicy vinegar concoction believed to have health benefits if drunk regularly. The ingredients were straightforward, I just bought a food processor (finally!), so I figured I’d start making my own so I can consume this daily.
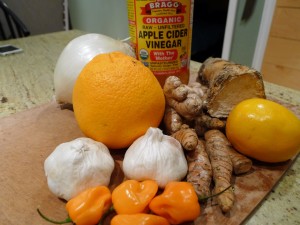
What you see is what you get: Onion, orange, horseradish, ginger, lemon, garlic, habañero, turmeric, and apple cider vinegar.
I quartered and sliced the orange and lemon, and de-stemmed and sliced the peppers. Other than that, I peeled the other ingredients and shred them in the food processor. Add it all to a jar, add some peppercorns, cover in vinegar, and wait one month.
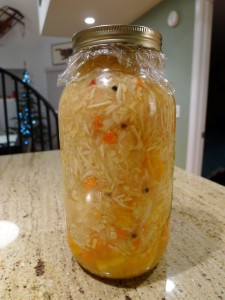
Here’s what I learned from the inter-webs: Plastic wrap prevents the lid from being corroded from the vinegar. It needs to be shaken up daily while it’s infusing over 3-6 weeks. Bragg raw unfiltered apple cider vinegar with the ‘mother’ is the ideal vinegar to use for fire cider. When it’s ready to be consumed, strain it in a colander with cheese cloth to squeeze every last drop and then transfer to a sterile jar and add local honey to make it as sweet as you like. It can be stored in the fridge for up to one year, though that will never happen in my house.
I’ll update this post in February when it’s done. I can’t wait!




Let’s get Social