Chickpea “Tuna” Salad
I have all but given up eating fish and seafood, including canned tuna, due to overfishing, mercury, polluted waters, micro-plastics in fish… etc. I have also never been a big fan of mayo, so when I used to make tuna salad I would opt for a mustard base. Discovering chickpea “tuna” salad was a pleasant surprise because it functions really well as a salad or sandwich, just like tuna salad, but is vegan (my version) or vegetarian if you choose to add mayo.
The ingredients are:
- 1 can chickpeas, drained and rinsed.
- 1/2 shallot or 1 TB red onion, minced
- 1 celery stalk, chopped
- 2 TB dijon mustard
- 2 TB olive oil
- ground pepper
- pinch of salt
- 1 TB Bragg nutritional yeast (optional)
- 2 TB chopped/crumbled nori (optional)
- pinch of paprika (optional)
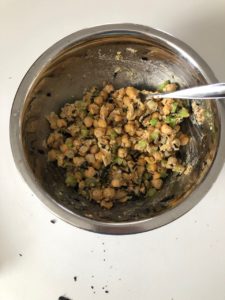
One thing I read the first time I made this salad was to mash or squeeze the chickpeas with your hands. It feels a little weird to grab handfuls of legumes and squish them, but I think the general idea is it allows the entire salad to come together more and stay together a little the way a tuna salad would. You’re not looking to completely mash them, but give them a bit of a squeeze.
Add your ingredients to a bowl and mix. It’s that simple. Use mayo if you’d like. The addition of nutritional yeast imparts a little more flavor of umami, and the nori gives it a little “from the sea” taste. They’re optional, but especially good if you’re on a salt-free diet.
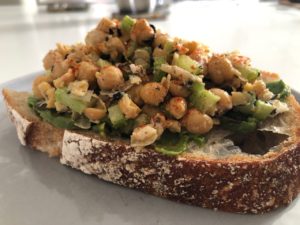
I put mine on some freshly baked sourdough with avocado for an open faced sandwich… aka “fancy toast.”
My Favorite Green Bean Casserole
- At January 11, 2021
- By megan
- In favorites, Green Beans, Potato, Recipes
 0
0
The first casserole that I remember eating was made by my college friend/roommate Anne for a Thanksgiving dinner we celebrated away from our families back in the day when students who went out of state for college stayed out of state for the Thanksgiving holiday and fended for themselves to make some sort of a dinner. Anne had her family recipe for a casserole topped with corn flakes, and 20+ years later I vividly remember her casserole yet have no memories of ever eating one before that. I suppose that means I did not grow up eating them. In fact, I never eat them. I never make them. I never think about them. That has now all changed.
The January-February 2021 issue of Christopher Kimball’s Milk Street has a very intriguing recipe for a Ligurian Green Bean Casserole. It’s prefaced with this story about this particular Italian casserole that’s served on the street in paper bags for easy snacking. The story made me hungry so I thought I’d give this recipe a try.
It’s a lighter version of a casserole that uses mashed potatoes rather than heavy cream or cream of mushroom soup. Having almost all of the ingredients in my house, I tweaked their recipe ever so slightly by using house made veggie broth rather than water and by adding way more parmesan cheese than the recipe called for. I also halved their recipe to make just enough for a square pyrex, not a large portion for two people to eat all week long. Here is my version that I am adding to my favorites and will certainly be making again and again, and possibly in the larger format to snack on all week long.
Ingredients:
- 2 TB butter
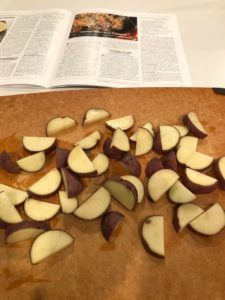
- 1/2 pound red potatoes cut into small-ish pieces (the recipe called for Yukon gold)
- kosher salt and fresh ground pepper
- 2 cups veggie broth
- 2 TB olive oil
- 1 shallot, finely chopped
- 1/2 pound green beans (I used frozen)
- 4 ounces cremini mushrooms, trimmed and sliced
- 1 Tb minced fresh oregano
- 1 egg, beaten
- 5 ounces grated parmesan
- 1/4 cup panko breadcrumbs
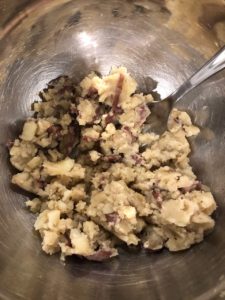
Add 1 TB butter to a pan on medium-high and add potatoes and a pinch of salt once the butter melts. Stir the potatoes to coat, then pour in the broth, and cover until the potatoes are cooked. When they’re easily pierced with a fork, remove them from the heat and transfer them to a bowl to mash them by hand to the consistency of chunky mashed potatoes.
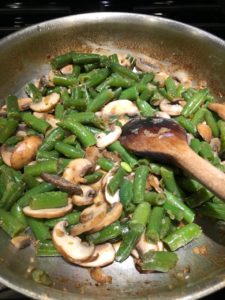
Return the pan on medium-high, add the olive oil, shallots, and a little more salt and cook about 5 minutes until the shallots are translucent but not brown. Add the green beans and sliced mushrooms and stir occasionally as they cook. Do not cook them all the way as they need to continue cooking in the oven. Pull them from the heat when the green beans are still bright green. Stir in the oregano right before turning off the heat. Transfer them to the bowl with the potatoes and mix to combine.
In another bowl, whisk the egg and mix in most of the parmesan, a little salt, and pepper. Fold this into the potato green bean mushroom mixture and then transfer to an oiled pyrex baking dish.
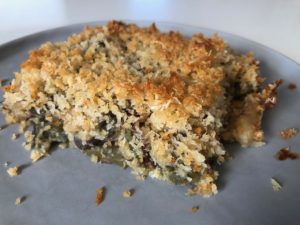
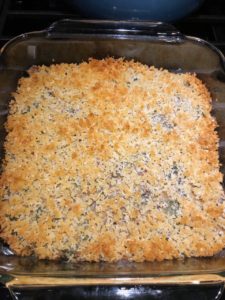
Heat the remaining oil and butter in a pan and coat the panko so it’s evenly moistened. Sprinkle over the potato mixture with some extra parmesan and bake at 400 for 30 minutes or so until bubbling at the edges.
This recipe is definitely a keeper in my opinion. The casserole itself is delicious. It’s great the following day with a fried egg on top as well. And the thing I appreciate most is this basic structure can be adjusted a little here and there with different potatoes, a variety of mushrooms, green beans or no green beans… I’ll have to see what I come up with.
Caramelized Onion, Apple, and Cheddar Sourdough Galette
- At November 21, 2020
- By megan
- In Apples, arugula, caramelized onion, Cheddar Cheese, pie crust, Recipes, thanksgiving
 0
0
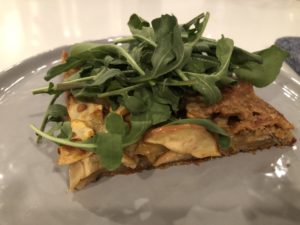
At the end of the summer I made a DELICIOUS savory sourdough crust tomato, cheddar, and caramelized onion galette for dinner. While eating it I fast-forwarded in my mind to when local apples would be in season because if you swap out those tomatoes for apples, all of the rest of the flavors still go together really well.
With Thanksgiving upon us, I’m thinking a galette makes more sense than a traditional pie this year. It especially makes more sense if you want the taste of a pie but don’t want to make a whole pie just for two or three people. With a galette, you can have a sloppy crust and make a smaller size, a win-win for someone like me who is not particularly good at making a decorative crust and who is having Thanksgiving at home for just the two of us. The galette in this post was meant to be savory, but you can take this idea and fill it with traditional sweet apple pie, cherry pie, etc.
Just like with my tomato “pie” I followed the recipe for the crust and baking instructions from The Perfect Loaf.
First I caramelized some onions in butter. I had an unrolled ball of crust in my freezer from my previous galette that I pulled out and put in my fridge the night before. While the onions caramelized, I brought the dough up to temp and then rolled it out on parchment paper and put it back in the fridge to chill again. I can’t recall which apples I used, but they were local to Colorado. I sliced them really thinly because my intention was not to make a syrupy sweet cinnamon-sugar pie filling that requires cooking down the apples and chilling them before filling your pie. For this dish I wanted the apples to just cook through while the galette cooked.
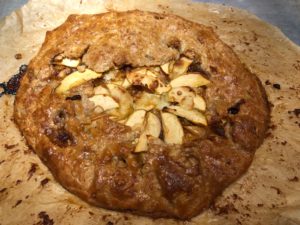
When it was about time to make dinner, I pulled the crust from the fridge and smeared the caramelized onions in a circle in the center, leaving about 4 inch edges from when you fold that on top. I layered apples and cheddar cheese with a little salt, pepper, and thyme from the garden. Bacon would actually go really well with this I’m just thinking now as I’m typing. Fold the edges up and press them a little to form one solid crust. The Perfect Loaf suggests an egg wash which I did as well as sprinkle a little salt since it was savory.
I served my apple onion cheddar galette with arugula from the garden.
I’m not sure if I’ll make a savory “pie” like this that will taste divine with my caramelized onion gravy that I’ve been making for more than a decade now, or a sweet version for Thanksgiving this year. In one form or another though a galette will be on our small menu.
Salted Peanut Butter Chocolate Chip Cookies
- At October 27, 2020
- By megan
- In cookies, dessert, peanut butter, peanuts, Recipes
 0
0
Sometimes I just need something to do during this “safer at home” Covid time period, and cooking is the hobby that I enjoy most. Today was a peanut butter cookie day, and that makes it a damn good day.
I altered a recipe I found on The Food Network for Peanut Butter Cookies by using less sugar, brown sugar rather than cane sugar, some spelt flour rather than 100% all purpose, added extra salt, and chocolate chips. Turns out I will make this recipe again so I’m documenting it here for my future use.
Ingredients:
- 3/4 cup dark brown sugar
- 1 stick unsalted butter at room temperature
- 1 egg
- 1 cup peanut butter (I use the freshly ground stuff you can buy at Whole Foods if I don’t make it myself)
- 1 teaspoon vanilla extract
- 1/2 teaspoon Kosher salt
- 1/2 teaspoon Hawaiian black lava sea salt (from Savory Spice)
- 1/2 teaspoon baking soda
- 1/2 cup spelt flour
- 1 cup all purpose flour
- 1 cup chocolate chips
The recipe is straightforward:
Preheat oven to 375 and line a baking sheet with parchment paper (or butter your baking sheet).
Cream together the butter and sugar. Add the egg and beat until combined. Add the peanut butter and vanilla and mix well. Then add the salt and mix until combined. Add the baking soda and flour and mix well. Fold in the chocolate chips.
I made 20 balls with my dough and pressed them a little to flatten them out a bit before baking. The Food Network recipe said it yielded 24 cookies, so I apparently made my dough balls a little large. But, that just means my end result is a larger cookie and I’m OK with that 🙂
These baked for about 15 minutes.
Enjoy!

Let’s get Social